10% done
In terms of the volume of mud we need to mix we are 10% through the process of building the walls. This coming week I hope to have the base layer completed around the perimeter of the slab. This is the process that is really holding things up.
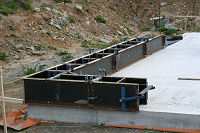
Pic 1 below shows the fourth layer of blocks set up and ready to pour on one of the window columns. Pic 2 shows the master bedroom corner which has been set up back to the recess in the slab, and that is where the thinner blocks then take over and wrap around the wet area. Pic 3 is a shot from sou’west of the slab.


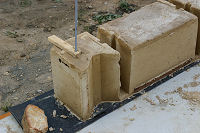
Pic 1 below is another shot from the rise behind the house. Pic 2 is my interpretation of the engineers spec for the expansion joints. This corner is the internal mud wall that creates the thermal mass behind the fireplace and acts as the entry way to the house.
All our expansion joints were specified as for standard double brick, meaning there is a gap that literally passes straight through the wall and only has a strip of foam keeping weather, vermin and bugs out of the house. My method is to encase a double thickness of this foam (2 strips of 100mm x 10mm) on the longer of the 2 angled faces and use a 20mm x 50mm hard foam strip down the middle of those 2 strips. When the next block is set to pour I will use 2 10mm x 50mm inserts to allow for the conventional 50mm sealing foam to be added later. The next block would then be poured straight against this, providing the expansion joint as required and hopefully excluding weather, vermin and bugs when this method is used on the external walls. If you’re confused, me too. Pics to come and the thousands of words they convey should clear the mud on that explanation.
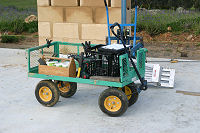
Pic 3 is one of those “godsend” finds and is a 4’x2′ garden cart that we use to transport all sorts of stuff from one end of the slab to the other. 40 metres from the staging area by the cars to the far end of the slab doesn’t sound like a long distance until you start traipsing back and forth half a dozen times to carry what this cart can in one trip. Once everything is in place the cart becomes our mud barrow when we use a couple of 60 litre tubs to pour the mix into. With a skid in place, this will make it easy to transfer the tub of mud to the mortar lift (below) to lift up to the higher layers.


And finally, the mortar lift. I’ve designed and welded together a lot of projects and gadgets over the years and this one is the first to scare me no end. What it is is a 600mm square base with a 500mm square cradle to hold the mortar sitting internal of this. It has been made to lift to 2700mm maximum. The winch is a standard boat winch with a 500kg rated capacity. The winch is offset to allow the cradle to rise and fall the full height of the mast. Atop the mast is a 100mm pulley spinning on a 5/8″ high tensile bolt as the axle. The mast has 10mm strips welded internally to stop the weight of the full cradle from tearing larger holes in the 2mm steel of the mast over time. To move the lift we simply use a sack trolley when needed. For safety reasons I will be checking the welds weekly as part of the maintenance routine we have in place for all the other machinery on site.


