Archive for the ‘Building Progress’ Category

Finally on to the house!

Monday, May 16th, 2011

Power room is now complete externally with the flashings, guttering and rainwater tank now in place. Extreme angle on the gutter is an experiment in capturing water as the overnight conditions are regularly dropping below 0C apparent temp causing moisture to condense on and drip off the steel roof and I’m curious to see how much we can get in the tank. Not much point having it drip and sit in the gutter if I can make it pool towards the pop end of the gutter and capture it.

I’m not sure just how much if any water can be captured this way but it’s worth a measure seeing this shed is 2% the roof size size of the finished house/shed/pergola/verandahs. That or I’m mad.

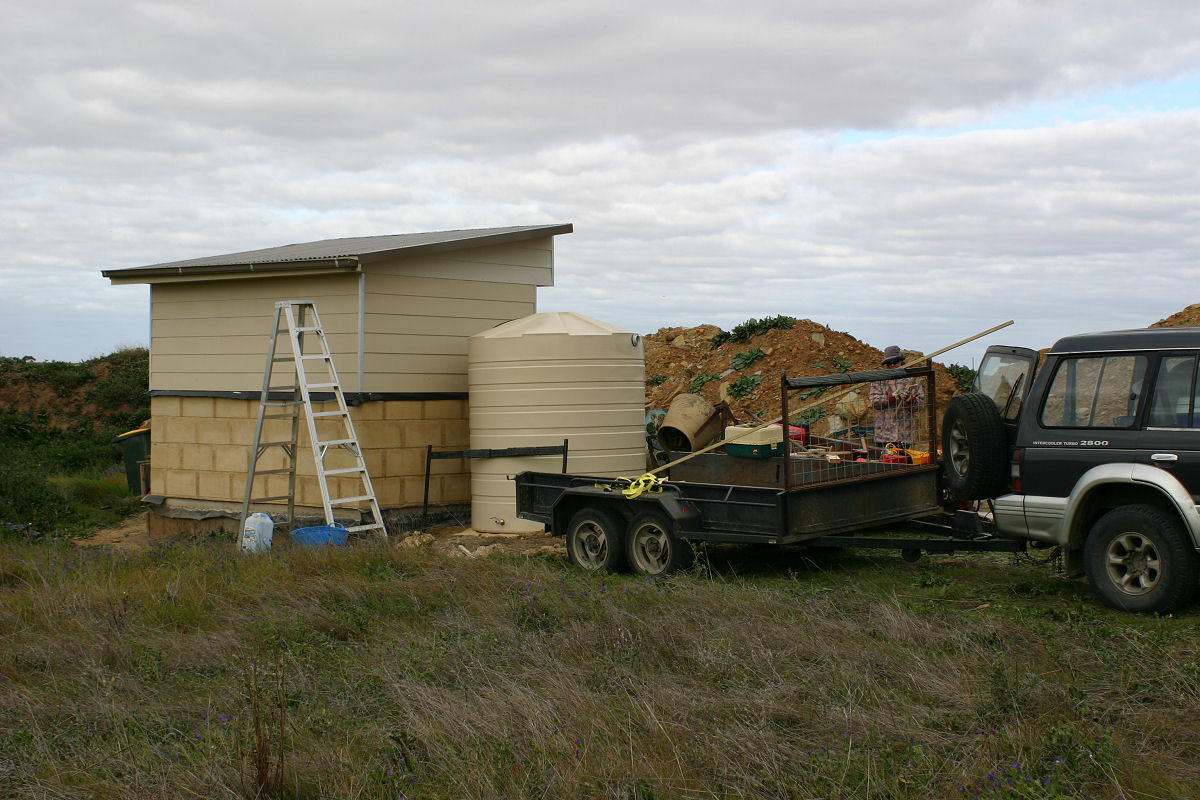
First and second pic show the tank after we levelled the ground and dropped it off the trailer into place. The genset in the little trailer has proved to be a winner and I have even managed to run a 15amp inverter welder off it with no hassles at all.

We have the insulation and plasterboard for the internal fitout that we will fix into place the first day the weather prevents us from working outside. Painting can also wait until we have a day where all moulds have been filled and we have a spare hour or two……

We set up the layout hurdles before we called it a day so we now have a simple job of stringing a line between hurdles to give us something to run the moulds against for nice straight walls.

Slowly making some headway

Saturday, April 2nd, 2011

Progress has been slow with the weather continuing to be unseasonally wet. First pic in this update shows the complete moulding for the layer set and ready to be poured.

Second pic is the levelling system in action, by propping the shutters with lengths of wood all we need to do is turn the bolts until the mould becomes level.

Third pic show the untouched voids which have been cracking.

Fourth pic shows one I tried filling with a metal trowel which scratched the blocks either side.
We’ve since found if we use a silicon spatula to push the mix into the cracks and then wipe it off with a wet cloth it is filling the cracks and they are not noticable.

Final pic is the embedded hardwood strips that the door and window framing will be fixed to. The strips have been sealed with linseed oil and antimould and have three 100mm galvanised screws set at obscure angles to make sure they stay anchored in the walls.

Progress report

Sunday, March 20th, 2011

It’s been a staggered effort with unseasonal wet – very wet – weather putting a stop to building several times over the past 2 weeks.

The rain is not all bad, the huge planting effort we made this time last year is clearly evident in the woodlot with many of those trees now over a metre tall and growing strong. We now have half of the power room walls in place and were going to pour another layer yesterday when another rain system set in and washed out the rest of the day.

Good news is all the bugs are looking to be worked out of the mould system. The major issue we have left is the vegetable oil when left for more than a day is going tacky and causing the skin of the poured blocks to come away when the moulds are stripped down. We are trialling the next layer with motor oil, which is thicker and “slicker” than the veg oil and will hopefully allow a clean release of the shutters from the set blocks.

A secondary issue is with filling the voids as subsequent layers are poured. These are shrinking considerably with minor cracking, and while consistent they do not “look right”. There should be enough depth to be able to apply a render coat in these areas and for consistency sake I’ll do the lot with one batch once the walls are up.

Photos to come this week. We literally have been carrying so much stuff in the truck and trailer to store in the neighbours’ sheds it’s come down to camera or food/water for the remaining space.

Technique refined

Wednesday, March 2nd, 2011

It’s taken a while with sickness and weather interfering with the schedule somewhat. One thing has become apparent and that is I need to leave the blocks set for 2 days before removing the molds. Overnight temps on the block are close to freezing already and this is slowing the cure of the earthen concrete.

Here are some shots of the dried blocks. You can see the cracking has developed in those that were too wet (first photo), however those that were not showing any cracking have not developed any so far. The look of the blocks with the defects as in the third pic are growing on me, I’m thinking so long as the finish is consistent it won’t matter if they are all dead flat or have those airpockets dispersed across the faces. When I pour the second layer I will attempt to fill some of these holes and see how that looks once set so we can fill any pockets that are too large and visually unappealing.

Being remote has its’ own issues, and as you can see from my trailer the amount of tooling and materials you need to carry is staggering. Second pic shows the shutters set to do the second layer. The third highlights again how being well prepared saves the day as I need to rethread this nut clogged with weld dags.

Last two shots show the void clamps and how they are used to allow filling of the gaps between the blocks.

So it really begins

Wednesday, February 16th, 2011

flickr in their wisdom have told me to have more than 200 photos on their site I must upgrade to a premium membership. Pfffffffft to that I say. To see larger pics click on the thumbnails.

So, after packing the Pajero and trailer with so much stuff it barely managed to crawl up the hills, we got onsite with virtually all the components needed to build the house. All that blue steel is the boom lift which I have completely forgotten to get photographs of so far.
 

First point of business was to get a grip on water usage, so a simple and cheap tank guage was installed. No more guessing or pointlessly tapping at the tank to guess how much water is in there.

With the tank done, next was installing the site toilet. The cladding is all recycled fencing panels, since this is not a permanent structure how it looks was the least important factor in its’ construction. The loo cistern is filled with a bucket and it has an el cheapo LED solar powered light for night use. The toilet is installed using an extra IP installed by the plumber.

With all that done and the site now comfortable for the wife, attention turned to laying the very first of the blocks of the power room. In total it took us 7 hours to set up the formwork, mix and pour 9 blocks. There was a lot of learning in that 7 hours and I have now made several mods to the formwork based on that experience.

For all those wondering why on earth I would choose to sleep in the back of the Pajero when the block is only 45 minutes away, that question was answered when I hit a roo on the way up the next morning. This was only a little roo, about 1 metre tall, and I only hit it at 60kmh. That bullbar is 4mm aluminium and you can see the deformation it did to that. I was very lucky to hit it while it was on the ground, had it been mid hop he would have joined me in the cab.

After stripping away the formwork of those first blocks the results were pleasing and again offered more lessons. The cracked blocks were made with very wet mix and shrank considerably while other blocks were not tamped enough, or were topped up with the next mix without being rodded through to combine the two mixes. In order of the thumbs we have: cracked block, bevelled wall ends, shutter divider void, dual mix block, dual mix block with corner block showing insufficient tamping. Last thumb is of the next generation of locusts that are crawling through the area at the moment. I’d estimate the numbers to be 100-200 per square metre.

Delayed start

Wednesday, February 9th, 2011

The usual crap life throws at you when you don’t need it meant we couldn’t get a start last weekend. My time during the week that I had set aside to tweak and test a few last things was eroded and I was not prepared to rush things to find them wrong or poorly thought out once on site.

I have made some modifications to the soil sifter. Using an old 220L pickle drum I cut the base out of it and took a slice of the curved surface to make a material chute to direct sifted soil into a container be it a bucket, tubtrug or yard cart.

The dividers also had a rework with a nut welded to the top of each. I can screw in a handle to this and make removing them very quick and easy. They have also been cleaned up so all sharp edges are ground down or rounded to improve safety on site.

I put together some tamping blocks in 2 sizes and made a spare set as well with left over steel and wood from all the other jobs from the past few weeks. I can quickly fix a 25mm hardwood handle to these, so we can vary the length for comfort and make the job less of a chore.

Photos of all this can be found on our flickr account, click here to see them.

Photo updates

Wednesday, January 26th, 2011

Sadly in the marathon of mixing we forgot to get any shots of the power room slab in progress. I have however upped a few to the flickr account of the form work before I stripped it away this morning. The void has been filled with the dolomite left over from the slab (which I forgot all about until I ran over it last night) which will give a nice firm base once watered in.

When we pour the slab this weekend we will be able to position the mixer to simply dump the mix straight into the formwork and hopefully this will mean less effort and less time since they are predicting 40C for Sunday. It will be a very early start, probably under car headlights, to avoid the heat for the 4 hours I expect it to take.

The latest photos include some shots of the shutter assembly, the soil tests, the sleeping platform in the Pajero and of course the concrete ring beam  ready for the slab. Grab a look at the pics here.

Power room slab

Monday, January 24th, 2011

We got the ring beam done for the power room slab last weekend and it does sit at least 150mm proud of where the slab base was to be. It took us nearly 7 hours of continuous mixing and pouring to get the job done. We kept a wet edge by alternately pouring in 2 spots and dragging the concrete around the formwork to distribute it. This weekend we’ll get back to it and pour the slab itself. After 7 days of curing we will then start with the walls.

Tonight I’m doing a test run of over-nighting by heading up after work and sleeping in the back of the old truck. I’ve put in an elevated platform that easily supports a double sized air bed so I am confident it will be comfortable enough to sleep on, the weather conditions will however be another matter. I won’t waste the time up there and will spend time back filling and compacting inside the ring beam. From our soil tests I know we have minimal clay and shrinkage due to drying out is less than 1% and this leaves me confident in adding the subsoil, wetting then compacting it as the back fill. I will avoid adding large rocks as they will create voids that may lead to issues later.

I still have to work (albeit with a much later start) despite it being Australia Day public holiday tomorrow, so this will be a good test of our organisation in terms of Elise having everything ready to go when I get home as well as planning for the overnight stays in terms of food, drink and other supplies. The new flat floor leaves me a huge area with 260mm of clearance to stash tools and materials under so they can remain hidden from view and I won’t need to empty everything before heading off to work.

Updates on a few pieces

Saturday, January 15th, 2011

Power Room
Foundations have been dug for the power room and after encountering a lot of large rock I’ve had to rethink how the slab will be laid.

Originally we were going to dig, reinforce and pour the slab and beams in one shot, now we’ll customise each of the beam reinforcing mesh configurations to avoid as much of the rock as we can. We will use some booker/tie rods protruding from the beam and then pour the ring beam by itself.

This will also lift the base of where the slab was to be by about 150mm to accommodate the required beam thickness. Once the beam has had a week or so to set we can then fill and compact that 150mm with crusher dust, lay a sheet of forticon and pour a slightly thicker slab with heavier reinforcement on top.

Mould System
All the testing and configurational tweaking is done and the system is ready for action. All we need is a power room slab to get started on. I have made a few small changes to pieces of the system just to make assembly of it quicker and easier for one person to handle.

Soil Tests
Tests are completed and we will be adding 10% sharp sand to the soil and cement mix. The soil is actually OK without it with minimal shrinkage in the test sample but since soil can vary in composition and we want a uniform finish, we will use the sand as a buffer that will avoid drastic changes to the mix as the build goes on.

Tour Down Under
A great event for the state and also a great pain in the ass for anyone that lives near or needs to travel along the stage routes. TDU passes through Tungkillo this year and rolling road stoppages with an enormous crowds travelling to and then lining the roads is going to make travelling to the build site to hard to bother with for 2 days this week.

Site Loo
With instructions from the plumber the site loo is now in place. It has shall we say million dollar views and a “light and airy” feel to it. Unfortunately the camera was forgotten in the scramble to get to the block after I finished work Saturday, so photos of the progress will be uploaded after next weekend.

Boom Lift
The crane has taken shape and sits in the yard tacked together enough to play with the functionality of  it. I need to rethink a couple of things the major one being expanding/reducing the physical footprint and the minor ones include things like wheel placement and other manoeuvrability issues. It will not slew so being able to turn it with load in place is going to be important.

Slab cure and plumbing blues

Saturday, December 4th, 2010

Slab is looking great 10 days after the pour. We’ve had some unseasonal wet weather and cooler conditions which have helped keep it damp. This week we’ll get up there with some markers and start measuring out and marking the locations for all the important bits in preparation for getting the walls started.

I’d like to get a feel for the layout and having it marked means we can set out and square up rooms and so on without the encumberance of the earth walls (and all the bracing and support they will need in place until the wall frames are up). It should also equate to less time with the plans and tapes once we get started building. Next weekend we will make a start on the power room hopefully getting the slab completed over the 2 days. We’ll be mixing the concrete on site as we can’t get a local company to deliver premix on a Sunday.

The plumber has encountered some large rock where the septic was to go and that will leave us with a $600 or so bill. He managed to work his way through rock when laying the drains with a jackhammer and concrete saw and this also will add to his final bill.

So, with the trades now finished their work the site is once again peaceful and the realisation of the amount of work to come is sinking in.