Archive for December, 2010

Season’s Greeting

Sunday, December 26th, 2010

What ever flavour of religion (or not) you follow here’s hoping you’ve survived the mayhem and chaos of family, booze and excess food of the silly season.

My list of things to do before we start building is rapidly disappearing with odds and ends being completed and tested. I have 2-3 days of tinkering left before the list is complete and then we are on the build, just in time for summer proper to get here.

That will present a few challenges with New Years day here predicted to hit 39C with a wild drop into the low 20’s for the following Sunday. I’m not quite sure just how the earth walls will cure when there is such a huge fluctuation in ambient temperature. My gut tells me the more consistent the temperature the stronger the cure but I can’t find any reliable information sources to back that up. With that in mind the start may be delayed until into the new year when things stabilise temperature wise.

I’ll get some pictures of the finished shutters and the odds and ends up some stage this week on flickr so you can see what I’ve been up to.

Holy weather damage batman

Sunday, December 19th, 2010

Well, none actually which is equally surprising. Our block had 108mm of rain fall in little over an hour (data thanks to farming neighbour) during the storm events of the past week so I was expecting to see a lot of damage to the building site. It was a serious rain event with gouging clearly evident down the hill where water had enough force to wash away the pasture.

Luckily for us our plumber is a clever fellow and he put carved drains in the surface after he had finished installing the sewerage drains and these kept the bulk of the water away from the slab. We had thankfully agreed on the septic tank to empty the rain water tank into as a security precaution and that is the only thing that saved it floating out of the hole and sailing down the hill in the torrent of water.

The driveway does show some washout but thanks to Rob and his mindset of do it once do it right he had rolled and compacted it enough for the surface to withstand the run off.

The only real loss we “suffered” was some of the dirt piles for the walls were diminished in the runoff. Still, that can easily be fixed with more dirt sourced easily on site.

Update on costs

Monday, December 13th, 2010

Finalise the account with the plumber – $7394.40
Excavation and rockbreaking for the septic – $605
Sundry bits and pieces – $68.75

Total project spend is now at $283 082.58
House only is now $69 130.08
Cost per square metre is now $240.03

Makin’ stuff and stuffing around

Saturday, December 11th, 2010

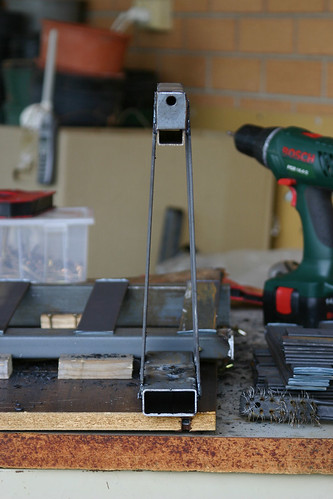
I’ve just about chewed through 5 kg of welding rods in finishing off various bits and pieces of the mould system and ancillary inventions. My dad is coming over next week to give me a hand with trimming up all the formply so I can bolt together the shutters and various custom corners to finish the mould system. Once these are done the very final bit of welding needs to be done to the dividers and that is adding the top locator bolts.

I must say I am very happy with how the system has come together, when you check out the very first idea I had for the dividers
Mold Divider Details
then compare that to the end result
Near perfect alignment
you can see how much lighter they will be for a start with about a third of the steel needed. The lighter design did need a lot more thought put into it to ensure some accuracy across all the pieces. The final design will have a thin sheet of oiled MDF placed either side and that will allow easy removal of the divider from the set blocks with the MDF then being gently peeled off the set face of the block, re oiled and then set again for the next run of blocks.

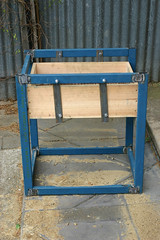
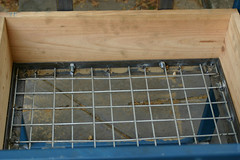
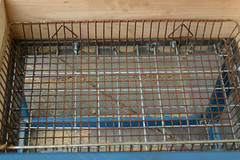
I put together a 2 stage soil sifter as well. We can sift down to 20mm aggregate by adding a removable mesh cage. This will be good for the walls and should give a nice smooth and uniform finish. The larger mesh filters down to 50mm, and that larger aggregate will be used in the retaining walls around the place.

Soil sifterSoil sifterSoil sifter

The stuffing around bit is in the soil tests we are conducting to work out the additives we need for the soil. So far I’ve done a couple of “shake tests” to seperate the soil particles into solids, sand, silt and clay and it looks like the soil is around 15% clay. I’ll run 2 earthen concrete shrinkage tests over the next week with soil as is and the soil cut back with 10% sharp sand by volume, both with 10% white cement as stabiliser.

Update on costs

Saturday, December 11th, 2010

RCI Engineering for site inspections before the slab pour – $430.98
United Fasteners for the threaded tie down rods – $684.90
Termimesh for slab penetration meshing – $522.50
Senturion Steel for materials to make an earth sift – $87.50

Total project spend is now at $275 014.43
House only is now $61 061.43
Cost per square metre is now $212.02

Metrics, measuring other indicators and blah blah blah

Saturday, December 4th, 2010

I like numbers. I like being able to define something in a meaningful dollar value to compare my efforts to commercial/professional results. I’m going to start adding a component to the project costs which measures the cost of our house per square metre right up until it is finished.

Internally “finished” will include the basic livablility items such as bathrooms, laundry and a functional kitchen but exclude items where personal taste can blow the budget – kitchen cabinetry and appliances, floor tiles, carpets, curtains, taps and light fittings for example.

Externally I will include the earthworks, verandahs, pergola, water tanks, hot water system, power system and pre-slab plumbing in the cost per square metre as these are all integral to the livability of the house. I will not include the physical footprint of the pergolas or verandahs in that calculation since they are almost equal to the size of the house itself.

As of right now, the cost of our house per square metre (at 288 square metres) is $205.04  If I include the verandahs and pergola (total of 506 square metres) that would skew the figure to $116.67 which is not representative of the cost of the house.

Build schedule

Saturday, December 4th, 2010

If I put this in writing then I have something to stick to……

I put my business into a halt a few months back after realising I cannot devote the proper time to it to make the money to build the house while building the house. I have since found work driving trucks on an afternoon shift run which guarantees money with fixed hours. The hours are favourable enough for me to drop in home, pick up an esky with some supplies and head out to the block to sleep. I should be able to get 5-6 hours work in before having to head back home, grab some lunch, clean up and head back to work. Weekends I’ll simply camp on the block and head back home Monday morning for work.

I have made some modifications to the old truck, ripping out the rear seats and forming a flat platform large enough for an airbed for one with considerable tool storage underneath. The tandem is also getting some mods done to be able to chain and lock larger tools (generator, mixer, formwork and so on) I don’t want to be bringing back and forth each day and this will be left on the property, chained to a very large concrete block.

The Walls
We are planning to start the actual house in the days following Christmas. Our plan is to have it weather tight by August. We have 920 blocks to make with formwork already made to pour 16 blocks in the 5-6 hours per day. I’ll allow myself 3 months to get the walls done.

The Windows
All the windows are being made by us from recycled hardwood from the species required for our bushfire zone. Iron bark and redgum are some of the acceptable timbers we can choose from. These won’t take long to make since I can set up a couple of router tables I bought in preparation for this and simply spend a day machining and cutting wood. The frames will be installed unglazed and I will pay a glazier to fix the glass once they are in place.

Having done this volume of work with recycled wood when building the kitchen in the last house we owned I know it will take around 7 days to machine, cut and assemble the 14 windows, 2 sets of french doors and the front door and side light.

The windows and doors will be deliberately rustic in nature with lots of wooden dowels being used and left visible for some interest. They should look right at home next to the mud walls.

The Roof
Footersville and Lysaght will be contacted for a firm delivery date once I have a clear picture of a finishing date for the walls. The walls will need 4 weeks to cure properly before we can load them so there will be a heck of a mess of bracing in and around the site until the trusses and wall frames are in place to take the bracing loads.

Our biggest challenge with the roof will be weather, the calm periods around our site are rare and short lived and it could take days or months to fit the roofing iron dependent entirely on the wind.

So we have around 4 months of work to get done over 8 months. It should be achievable and the date is firm as one of us is celebrating a milestone birthday and we’d like to have it in our own home.

Slab cure and plumbing blues

Saturday, December 4th, 2010

Slab is looking great 10 days after the pour. We’ve had some unseasonal wet weather and cooler conditions which have helped keep it damp. This week we’ll get up there with some markers and start measuring out and marking the locations for all the important bits in preparation for getting the walls started.

I’d like to get a feel for the layout and having it marked means we can set out and square up rooms and so on without the encumberance of the earth walls (and all the bracing and support they will need in place until the wall frames are up). It should also equate to less time with the plans and tapes once we get started building. Next weekend we will make a start on the power room hopefully getting the slab completed over the 2 days. We’ll be mixing the concrete on site as we can’t get a local company to deliver premix on a Sunday.

The plumber has encountered some large rock where the septic was to go and that will leave us with a $600 or so bill. He managed to work his way through rock when laying the drains with a jackhammer and concrete saw and this also will add to his final bill.

So, with the trades now finished their work the site is once again peaceful and the realisation of the amount of work to come is sinking in.