Archive for the ‘Uncategorized’ Category

Coleman Air

Friday, December 28th, 2012

Occasionally you just need to tell people when you are happy with how a company makes products and conducts business. I would like to take a moment to tell those of you considering an off grid setup about Coleman Air

I ordered a substantial amount of equipment from them (enough for the house plus a separate setup for the aquaponics shed) and it was here within a week of them sending it out to me via DHL. It was extremely well packed with the volume of each box roughly twice the contents, the contents neatly and securely wrapped in bubble wrap and then completely immersed in a protective cocoon of shredded paper. The boxes took an obvious beating during the trip and the contents were completely unharmed.

I was also keen to have a look at the quality of the gear, as they do assemble the equipment themselves. All the work is very neat and tidy and gives the impression it was crafted rather than just slapped together.

If you’re going to go off grid I encourage you to take a look at what they have to offer, especially the charge controllers. Just remember, they are US based and you will be liable for import duties and taxes if you exceed $1000 as a private importer. Our duties and taxes were roughly 15% of the invoiced amount.

Seasonal pleasantries

Sunday, December 23rd, 2012

And again it is the time of year where I say with/without the religious beliefs you do/do not follow, happy and safe silly season to you all.

The roof will not be on before the end of the year as the trusses are not able to be delivered before January 14 next year. The roof iron has been slated for delivery the week after that.

I have the electrical control gear and the panels for the house safely stored and waiting to be rigged up. Timber for the windows and doors is being shaped and will soon be ready for glass.

Lots is happening, just doesn’t look like anything is getting done…. still it is that season.

RIP trusted workhorse

Wednesday, July 20th, 2011

The Pajero had started developing some worrying oil leaks so is being retired to the farm to be used as a paddock basher once we are living up there. Mechanically it still operates as it should, it just has a crack or hole somewhere at the back of the head/block causing it to drop oil like a typical Holden.

I’ve replaced it with a 2007 Ford Ranger dual cab with a tray back rather than a tub. Over the last 2 weeks we have been working on adding all the bits and pieces needed to make it the workhorse we want and need. So far we’ve added a pair of cavernous toolboxes, central locking/immobiliser, turbo timer and dual batteries for remote power via an inverter.

Using Anderson plugs the secondary battery can be swaped out for a third, fourth and so on to allow batteries to be recharged during the trips to and fro. The inverter is used to charge batteries for the cordless menagerie of tools we have. On site the dual battery switching solenoid protects the starter battery from discharge by disconnecting it from the secondary battery which runs the inverter. While we’re travelling the secondary battery is automatically charged once the main battery is topped up.

First pic is the new truck, second shows battery in position with dual Anderson plugs, third shows the power take off for the light and cigarette lighter in pic 4. I fixed the battery in place using some angle aluminium pop riveted to the base of the toolbox, topped with a sheet of ply to isolate the battery from the tool box itself. The tie down is a strap hinge with most of the loop around the pin of the strap cut away so it can be angled under and drop down to secure it, then fixed down with a standard battery tie down at the other end.

Making a trommel – Part 2

Sunday, June 19th, 2011

All bolted together the working end of my newest toy looks like thumb 1. By this time I had decided a secondary panel inside the drum to keep things working away was not necessary, and instead I split a length of 100x100x2mm steel to make two large pieces of angle. I used these to both joint the drum ends and the screen together as well as provide agitation in the drum as the material tumbles around. Thumb 2 shows where all the rock eventually tumbles out of the drum. Last pic shows how I attach most materials that are welded end on. Tacked into position first and then a piece of angle iron on at least 2 sides is fully welded to provide extra rigidity.

Since belts stretch and need constant tensioning I added in a simple system to achieve this as seen in the next thumb. To tension the belt all that needs to be done is the 100mm bolt is screwed further into the assembly, pushing the entire engine up. The opposite end is bolted through 2 pieces of angle to act as the pivot point. Last thumb shows how the angle of the drum can be adjusted should it need to be set up on sloping ground, a few cranks on the turnbuckle can raise or lower it quickly and easily.

Making a trommel – Part 1

Sunday, June 12th, 2011

The earth sift I made works as it was intended. BUT…. it is time consuming and it does take a toll on the body having to bang the sieve screen to get dirt to fall through it. At this time of the year the clays in the soil are also activated and you end up with a “sloppy” rock wobbling around on top of the screen.

Trommels are an industrial machine that are basically a perforated rotating drum on a slight angle. The material to be sifted is dumped in the higher end, the drum rotates with anything smaller than the screen passing through it as it tumbles with the larger particles passing through the lower end and into a spoil pile (or as in mining into a crusher).

So here is the simple outline of how I made a trommel to make my job of sifting soil for the walls easier.

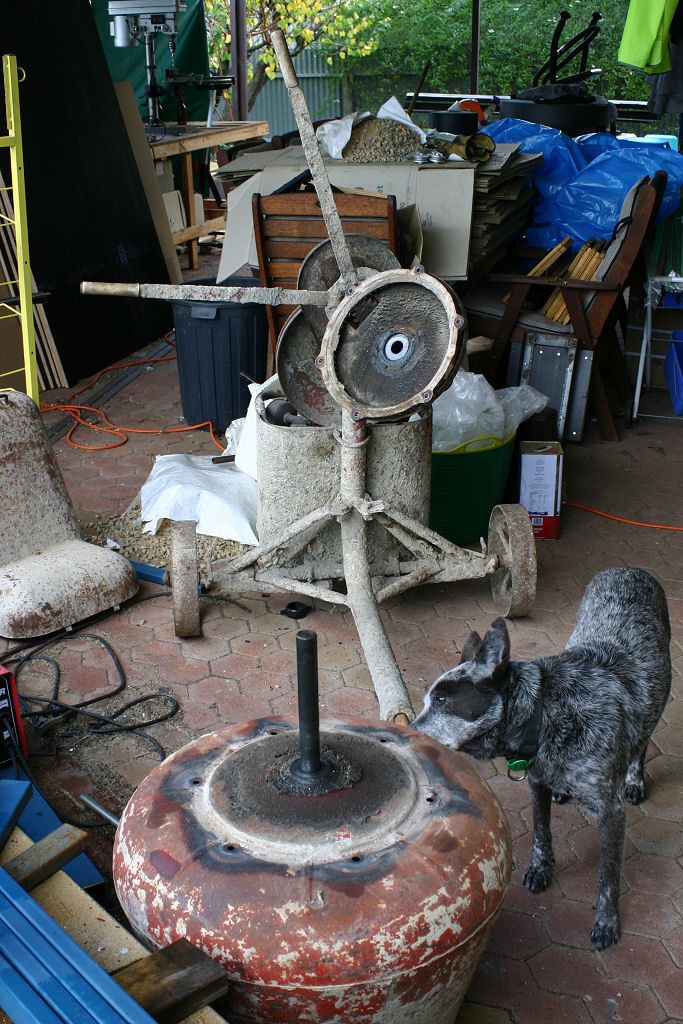
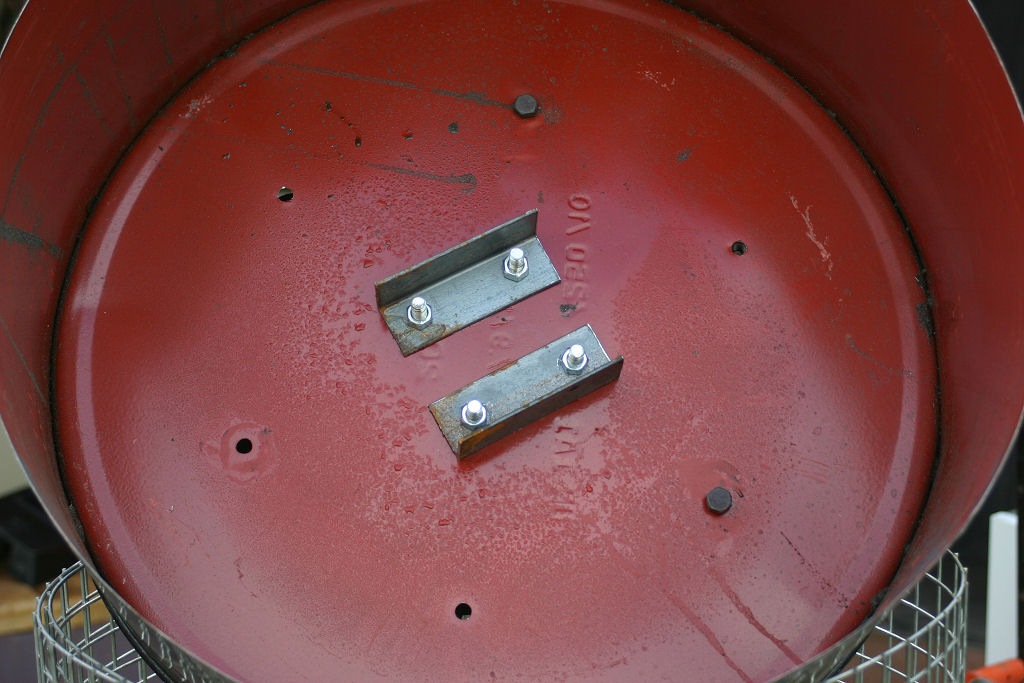
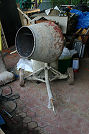
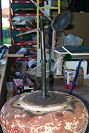
First job was to secure a cement mixer, a quick tour through eBay and their localised subsidiary Gumtree found a suitable cement mixer for sale for $180. I used this as a base since a trommel needs a slow and controlled spin and a cement mixer already has the gearing in place to achieve this. Important note is that mixer had a bowl that was bolted to the gearing. The first thumb below is the mixer I bought. Second thumbs shows bolts cracked and the bowl removed to expose the gearing.

I picked up an ex food 44 gallon drum for $15 and an elcheapo 5.5HP honda knock off engine for $177 from Paramount Browns. The drum I sat in a square frame on casters and used the momentum of the grinder to cut a 100mm lip into the lid and then separate the drum into hoops, roughly a third of the drum per section as in the third thumb.

Also in the third thumb is the most difficult part by far – getting the 25mm galvanised wire sheet ($42 from Senturion Steel) to roll. That took several ratchet straps and a lot of swearing to roll it back on itself. I’ll leave that strapped up until the frame of the drum is complete and then I will unleash it and trim the excess.

Last thumb in this group shows the new axle for the trommel, it’s a very large 1&1/8 x 10 inch high tensile bolt which also happened to be very expensive at $38.

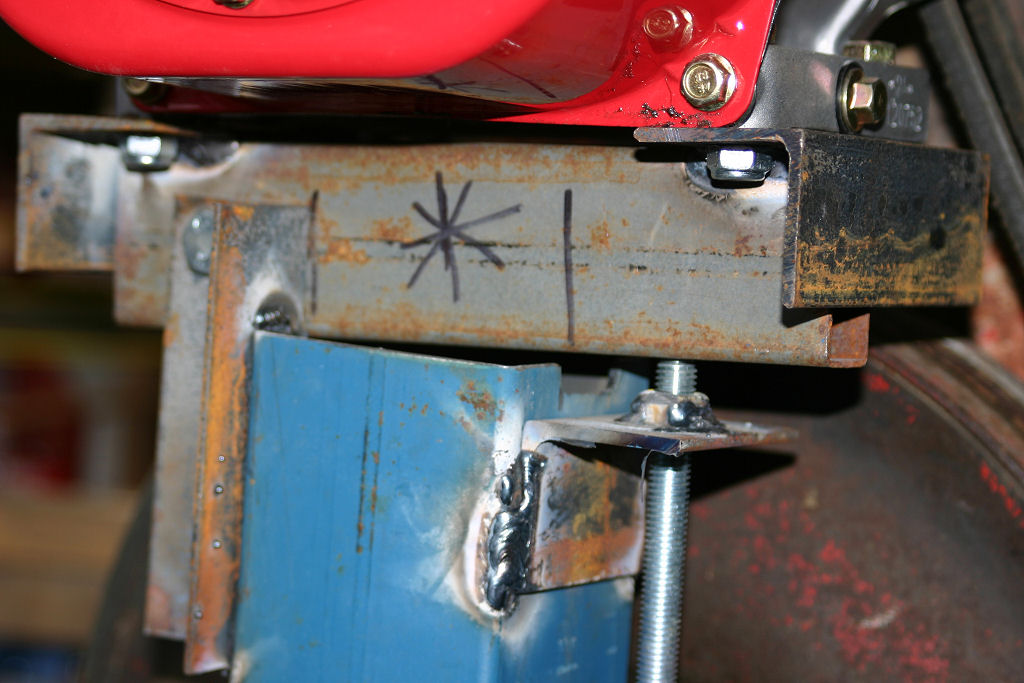
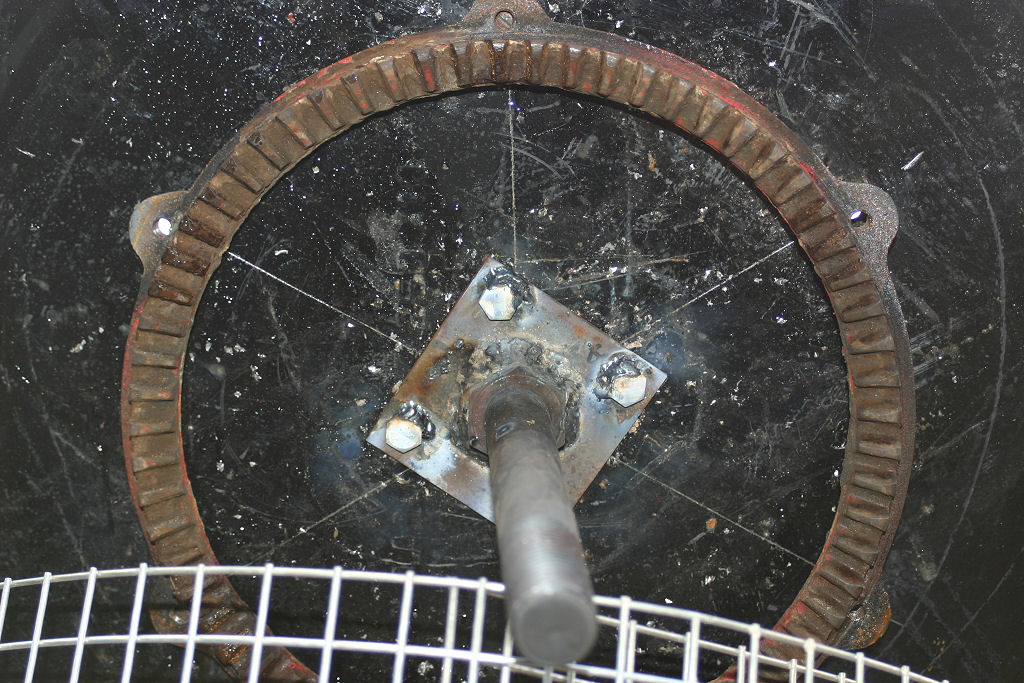
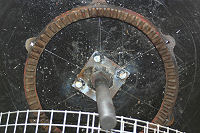
First thumb in this group shows how the gearing works in the mixer. Second thumb shows the axle and gearing in place. The bolt was welded to a 5mm plate with a hole drilled into each corner of it. The most thinking of the job involved working out how to centre the axle in the base of the drum.

I did this by subtracting the diameter of the gear ring from the diameter of the drum, halved the result then used a ruler to mark that measurement in as many places as possible around the rim of the drum. From there I positioned the gearing ring and marked the bolt holes. Once the holes were drilled I scratched a line between opposing sides and that gave me the centre of the drum. Since there are six holes and the bolt head is hexagonal, simply lining up the “corners” of the bolt head with the scratched lines centred the axle assembly perfectly. Holes were drilled, bolts welded to the plate and internally the bolts were secured using a small piece of angle to spread some of the load as shown in thumb 3.

All up this gadget will come in under $500 and since the mixer bowl will be able to be restored I’ll be able to sell it once the project is finished as either a mixer, a trommel or both.

Finishing off the power room

Tuesday, May 3rd, 2011

Easter provided me with 3 days off instead of the usual Sunday each week and we were able to get a fair amount accomplished in that time. I had made all the wall frames and roof trusses at home from some extra cheap timber I picked up off ebay. We trailered them up and simply lifted them into place and squared and fixed them in place.

You may notice the frames are doubled up, this was so the weatherboards and the internal linings would overhang the earthen walls to keep water externally and dust internally from sitting on the lip that would have been created had I used a single frame.

No bracing was used as the Hardi Plank weatherboards are able to be used as a structural brace.

We used a breathable barrier as per Hardi Plank installation instructions. Roof has a 75mm breathable blanket under the tin.

Door and window have been fitted, all I have left to do is flash the corners and give it a couple of coats of paint. Internally the fitout can be done as rain and wind make working outdoors too difficult.

Update on costs

Tuesday, January 11th, 2011

Paramount Browns for boom lift components $129.96
Senturion Steel for boom lift components $296.76

Total project spend is now at  $284016.79
House only is now $70064.29
Cost per square metre is now $243.28

Almost there

Saturday, August 21st, 2010

Dare I say it, but after a quick email salvo back and forth between us and the certifier it looks like we will have the approved documents in our hands this week. While this should give us a free pass through council I’ll not take that for granted seeing as this has taken so long with so much reworking of reports to get to this stage.

A huge thank you to Tany at Pocius and Associates for getting all the paperwork sorted and the checking through and certifying of all the engineering documents.

I got myself a heavy combination (HC) truck license as well for future use as we develop our business plan on the block. If you are looking for a truck license in Adelaide I can highly recommend Rob and the team at GNL Heavy Vehicle Driving Centre. I had a great time learning how to drive the Eaton Road Ranger gearbox and with Rob’s patience and excellent tuition I soon felt very comfortable with driving such a large vehicle.

Waiting, waiting, waiting and still waaaaaaiting

Thursday, February 18th, 2010

Title says it all really. Waiting for the engineering to come back on the roof trusses and wall frames (1 job) and the pergola and verandahs (1 job) before we can go any further with the application for building consent.

While we’ve been waiting we have tendered out for a concreter to do the slabs, a plumber to do the pre-slab plumbing and install the septic tanks and steel supplier for the roofing, fascias (must be steel under bushfire regulations) and gutters.

I’ve settled on having at least 3 quotes as the minimum for each before I will settle on the winning tender for each. For the steel this is proving to be a winning strategy as one supplier has quoted the entire job at less than another has quoted on the roof sheeting for the house alone. Go figure since they all use the same supplier ultimately for “Colorbond” products.

This process is also letting us ink in figures for the budget and our estimations from when we started planning are so far aound on the mark. I also invested in some more reading materials, “House Building Manual” by Allan Staines, “Roof Building Manual” by Allan Staines and Lloyd Hiddle and “Deck and Pergola Construction” by Allan Staines. I’ll include the cost of those in the next costs update post.

I’ve built a 5mm mesh half cage for the 10×6 trailer so we have a good sturdy place to tie awkward things to inside the trailer. I bought a steel cut off saw to do this job, and I’ll use that to make the mold dividers for the block system as well.

We also grabbed a bargain kitchen bench and sink off eBay which will satisfy the council requirements for a kitchen for the occupancy certificate as well as a very expensive pre-wash tap as used in commercial kitchens that we’ll fix to the laundry and use for washing all sorts of things from veggies to beer brewing tubs.

Floorplan

Wednesday, January 13th, 2010

tcomboClick on this image to bring up a larger and somewhat easier to read version. It’s hard to make it fit into the constraints of this blog due to the proportions of the actual building.

I’ll take credit for the floor layout bar the ensuite and bathroom which are Darren’s ideas based on what we described we wanted.

In the elevation you are looking at the “front” of the house, despite this actually facing away from the road. This has the view that I put up as the header image for this blog. All the windows on this side are awnings as it is windy and conventional sliding windows would rattle incessantly.  You’ll notice very few windows to the south and west (top and left of the floorplan) as these are where the predominant winds blow in, bringing dust in summer and driving rain in winter. There is one large expanse of glass to the north wall of the house, and this is intended to help with passive solar heating.

We’ve stepped down the verandah and shed to suit the contour of the housing site, and this will also keep us within the council’s stipulated 1.5 metre maxiumum depth excavation for the housing site. As yet we are undecided on whether to pave or deck this area, paving being non combustible is the smart choice but decking can be so sexy and seductive it may just win out in the end.

Other designed features:
The large amount of solid wall around the entry. We’ll have the fireplace in this corner and the massive amount of thermal mass will mean heat continues to radiate into the room long after that fire has burnt out.  Above this we’ll have a fan that pulls the hot air above the fire and flows it back gently into  the sleeping and wet areas and this will be our heating.

The return verandah. The slope and cut in of the site of the house means this verandah will virtually prevent the sun hitting the westerly wall at all, winter or summer. The eastern side (the view) has poly carbonate offset from the window in angles carefully worked out by Darren so the winter sun will penetrate the house until about 11.30am where I’ve calculated that in summer that verandah will already be shading the house by around 9.30am. On the northern side of the house, the only side without the return, summer sun is excluded all day while in winter the direct sunlight will flood in almost all day to gently heat the slab.

The not so open plan. We’ve lived in a house that was almost completely open excepting the bedrooms and bathrooms. It was very noisy and bloody expensive to heat and cool as well. With this design we have one main living area which can be shut off from the rest of the house. All the rooms beyond this can also be isolated, important for climate control as well as noise.

Big thanks yet again to Darren for his work on this project and for letting me publish the designs.