February 16th, 2011
flickr in their wisdom have told me to have more than 200 photos on their site I must upgrade to a premium membership. Pfffffffft to that I say. To see larger pics click on the thumbnails.
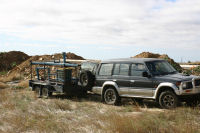
So, after packing the Pajero and trailer with so much stuff it barely managed to crawl up the hills, we got onsite with virtually all the components needed to build the house. All that blue steel is the boom lift which I have completely forgotten to get photographs of so far.

First point of business was to get a grip on water usage, so a simple and cheap tank guage was installed. No more guessing or pointlessly tapping at the tank to guess how much water is in there.

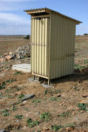
With the tank done, next was installing the site toilet. The cladding is all recycled fencing panels, since this is not a permanent structure how it looks was the least important factor in its’ construction. The loo cistern is filled with a bucket and it has an el cheapo LED solar powered light for night use. The toilet is installed using an extra IP installed by the plumber.


With all that done and the site now comfortable for the wife, attention turned to laying the very first of the blocks of the power room. In total it took us 7 hours to set up the formwork, mix and pour 9 blocks. There was a lot of learning in that 7 hours and I have now made several mods to the formwork based on that experience.


For all those wondering why on earth I would choose to sleep in the back of the Pajero when the block is only 45 minutes away, that question was answered when I hit a roo on the way up the next morning. This was only a little roo, about 1 metre tall, and I only hit it at 60kmh. That bullbar is 4mm aluminium and you can see the deformation it did to that. I was very lucky to hit it while it was on the ground, had it been mid hop he would have joined me in the cab.


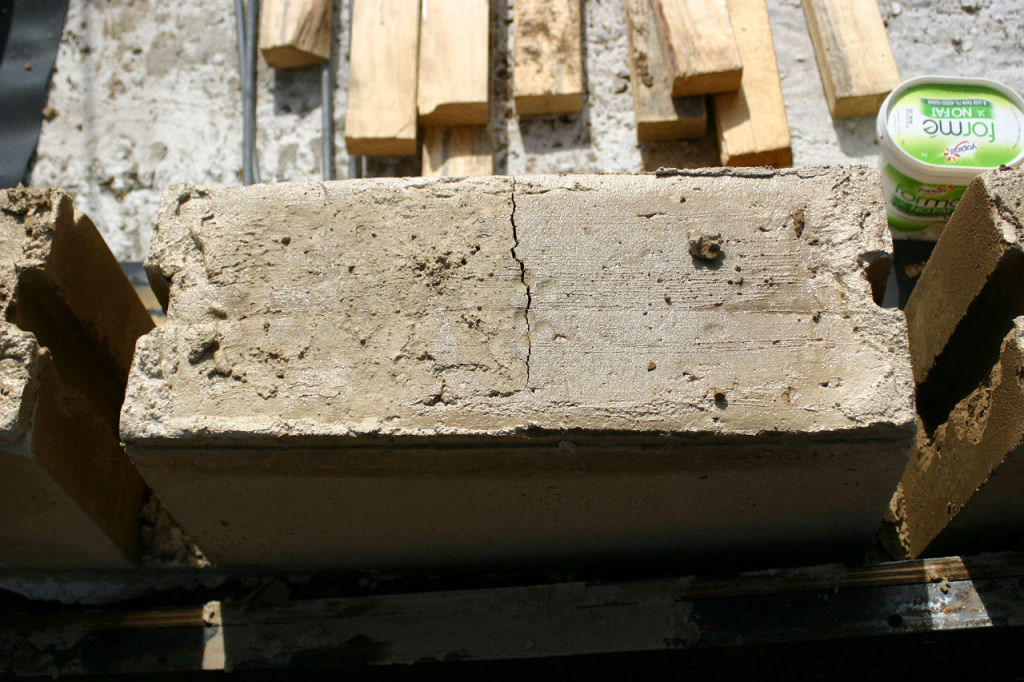
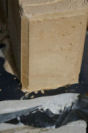
After stripping away the formwork of those first blocks the results were pleasing and again offered more lessons. The cracked blocks were made with very wet mix and shrank considerably while other blocks were not tamped enough, or were topped up with the next mix without being rodded through to combine the two mixes. In order of the thumbs we have: cracked block, bevelled wall ends, shutter divider void, dual mix block, dual mix block with corner block showing insufficient tamping. Last thumb is of the next generation of locusts that are crawling through the area at the moment. I’d estimate the numbers to be 100-200 per square metre.


Posted in Building Progress | No Comments »
February 9th, 2011
The usual crap life throws at you when you don’t need it meant we couldn’t get a start last weekend. My time during the week that I had set aside to tweak and test a few last things was eroded and I was not prepared to rush things to find them wrong or poorly thought out once on site.
I have made some modifications to the soil sifter. Using an old 220L pickle drum I cut the base out of it and took a slice of the curved surface to make a material chute to direct sifted soil into a container be it a bucket, tubtrug or yard cart.
The dividers also had a rework with a nut welded to the top of each. I can screw in a handle to this and make removing them very quick and easy. They have also been cleaned up so all sharp edges are ground down or rounded to improve safety on site.
I put together some tamping blocks in 2 sizes and made a spare set as well with left over steel and wood from all the other jobs from the past few weeks. I can quickly fix a 25mm hardwood handle to these, so we can vary the length for comfort and make the job less of a chore.
Photos of all this can be found on our flickr account, click here to see them.
Posted in Building Progress | No Comments »
February 2nd, 2011
Garden Grove for 30 ton of sand – $1323
Total project spend is now at $286,997.42
House only is now $73,044.92
Cost per square metre is now $253.63
Posted in Project Costs | No Comments »
January 27th, 2011
Bianco for a few bits ‘n’ pieces $14.24
Bunnings for the materials for the toilet shelter $292.51
Total project spend is now at $285,393.39
House only is now $71,440.89
Cost per square metre is now $248.06
Posted in Project Costs | No Comments »
January 26th, 2011
Sadly in the marathon of mixing we forgot to get any shots of the power room slab in progress. I have however upped a few to the flickr account of the form work before I stripped it away this morning. The void has been filled with the dolomite left over from the slab (which I forgot all about until I ran over it last night) which will give a nice firm base once watered in.
When we pour the slab this weekend we will be able to position the mixer to simply dump the mix straight into the formwork and hopefully this will mean less effort and less time since they are predicting 40C for Sunday. It will be a very early start, probably under car headlights, to avoid the heat for the 4 hours I expect it to take.
The latest photos include some shots of the shutter assembly, the soil tests, the sleeping platform in the Pajero and of course the concrete ring beam ready for the slab. Grab a look at the pics here.
Posted in Building Progress | No Comments »
January 24th, 2011
We got the ring beam done for the power room slab last weekend and it does sit at least 150mm proud of where the slab base was to be. It took us nearly 7 hours of continuous mixing and pouring to get the job done. We kept a wet edge by alternately pouring in 2 spots and dragging the concrete around the formwork to distribute it. This weekend we’ll get back to it and pour the slab itself. After 7 days of curing we will then start with the walls.
Tonight I’m doing a test run of over-nighting by heading up after work and sleeping in the back of the old truck. I’ve put in an elevated platform that easily supports a double sized air bed so I am confident it will be comfortable enough to sleep on, the weather conditions will however be another matter. I won’t waste the time up there and will spend time back filling and compacting inside the ring beam. From our soil tests I know we have minimal clay and shrinkage due to drying out is less than 1% and this leaves me confident in adding the subsoil, wetting then compacting it as the back fill. I will avoid adding large rocks as they will create voids that may lead to issues later.
I still have to work (albeit with a much later start) despite it being Australia Day public holiday tomorrow, so this will be a good test of our organisation in terms of Elise having everything ready to go when I get home as well as planning for the overnight stays in terms of food, drink and other supplies. The new flat floor leaves me a huge area with 260mm of clearance to stash tools and materials under so they can remain hidden from view and I won’t need to empty everything before heading off to work.
Posted in Building Progress | No Comments »
January 20th, 2011
Garden Grove for 10 ton of sand and metal – $564
Bianco for reo steel for power room slab – $228.65
Bianco for 800 kilograms GP cement – $277.20
Total project spend is now at $285,086.64
House only is now $71,134.14
Cost per square metre is now $246.99
Posted in Project Costs | No Comments »
January 15th, 2011
Power Room
Foundations have been dug for the power room and after encountering a lot of large rock I’ve had to rethink how the slab will be laid.
Originally we were going to dig, reinforce and pour the slab and beams in one shot, now we’ll customise each of the beam reinforcing mesh configurations to avoid as much of the rock as we can. We will use some booker/tie rods protruding from the beam and then pour the ring beam by itself.
This will also lift the base of where the slab was to be by about 150mm to accommodate the required beam thickness. Once the beam has had a week or so to set we can then fill and compact that 150mm with crusher dust, lay a sheet of forticon and pour a slightly thicker slab with heavier reinforcement on top.
Mould System
All the testing and configurational tweaking is done and the system is ready for action. All we need is a power room slab to get started on. I have made a few small changes to pieces of the system just to make assembly of it quicker and easier for one person to handle.
Soil Tests
Tests are completed and we will be adding 10% sharp sand to the soil and cement mix. The soil is actually OK without it with minimal shrinkage in the test sample but since soil can vary in composition and we want a uniform finish, we will use the sand as a buffer that will avoid drastic changes to the mix as the build goes on.
Tour Down Under
A great event for the state and also a great pain in the ass for anyone that lives near or needs to travel along the stage routes. TDU passes through Tungkillo this year and rolling road stoppages with an enormous crowds travelling to and then lining the roads is going to make travelling to the build site to hard to bother with for 2 days this week.
Site Loo
With instructions from the plumber the site loo is now in place. It has shall we say million dollar views and a “light and airy” feel to it. Unfortunately the camera was forgotten in the scramble to get to the block after I finished work Saturday, so photos of the progress will be uploaded after next weekend.
Boom Lift
The crane has taken shape and sits in the yard tacked together enough to play with the functionality of it. I need to rethink a couple of things the major one being expanding/reducing the physical footprint and the minor ones include things like wheel placement and other manoeuvrability issues. It will not slew so being able to turn it with load in place is going to be important.
Posted in Building Progress, The House | No Comments »
January 11th, 2011
Paramount Browns for boom lift components $129.96
Senturion Steel for boom lift components $296.76
Total project spend is now at $284016.79
House only is now $70064.29
Cost per square metre is now $243.28
Posted in Uncategorized | No Comments »
January 10th, 2011
Life keeps getting in the way with family and the many birthdays around this time of year so things just seem to keep getting delayed. However, this weekend we shall be setting up the foundations and footings for the power room and pouring the slab early into next week.
All the mould system has been completed and is just going through the final “what if?” scenarios to make sure it truly is as flexible as I have designed it to be. I am so far happy with it, the proof will of course come in that first row of blocks of the power room itself.
To help with all the lifting of earthen concrete, the formworks and later the roof trusses, I have designed and am about to start building a boom lift controlled with a hand winch for horizontal movement and a remote controlled 12volt winch for rise and fall. It’s substantial enough for me to confidently predict it will lift the 100-150kg loads I expect it to encounter at heights to 6 metres. It will be easy enough to move with a jockey wheel to lift one end off the ground and a pair of 200kg rated bearing wheels at the other. The base will be welded flat welded box section with the rest of it bolted together so it can be flat packed for moving.
Posted in The House | No Comments »