Archive for the ‘Building Progress’ Category

Return to building

Saturday, October 20th, 2012

I have spent most of October back on the block, working towards finishing the walls by the end of this month. The good news is it looks like we’ll finally make a deadline with 4 honest days’ work left to complete the ninth level of the external blocks.

Here are a few pic updates of what’s happening around the place.

Pic 1 above is “Tweety” the mixer. It is a beast of a machine and has been working even harder than the mixer we killed before. Pic 2 shows the only real damage almost 5 months of cold miserable weather has caused to the existing walls with the blocks becoming “face blown”. Not a great deal to us since we’re more interested in a house with character than one which is clinical perfection. Pic 3 is where the first of the aquaponics sheds will go, once the roof is on the house.

Pic 4 below shows the woodlot planted around 3 years ago. Many of these gums are now over 2 metres tall and should be ready to start harvesting in another 2-3 years.

75% done

Sunday, May 20th, 2012

Things are slowing dramatically at the moment.

Just about every day has some sort of rainfall event, ranging from the annoying to the work stopping. The temperatures are already approaching zero overnight and we are back to allowing 2 days between pour and strip down of the moulds to allow the earth to harden enough to avoid damage. The cold is also bringing large amounts of heavy fog and dew which coats everything and having to “dry” everything again slows the processes from cleaning to oiling and resetting.

It’s all rather frustrating, but that is the joy of building with mud.

Over 70%

Wednesday, April 25th, 2012

Apologies for no recent updates. Last week we passed the 70% mark, currently at 72% of the mud mixed and poured. Just about all sections will be at 7 levels by the end of next week, barring bad weather which has written off this week so far.

Pic 1 above is the smaller windows for (left to right)  the main toilet, ensuite toilet, shower room and walk in robe. Pic 2 shows the kitchen window looking through Elise’s craftroom window opening. The kitchen window is the first major variance from the plans. It was meant to be 1200 wide, but this did not look right when I formed the opening so I’ve cut half a block from each side to widen it to 1800. It now looks “right”.

Pic 3 is the same openings as pic 1 taken further back up the hill. I decided to form across the entire span to assist with keeping the small columns plumb. Pic 4 is the cross bracing being used to keep the columns between the windows at the front of the house upright in the strong breezes we get up here. The timber is crossed at 70 degrees and bolted to the columns using the threaded rod cast into the walls to allow framing to be fixed. Wood screws fix off the cross piece.

Photo update

Wednesday, February 29th, 2012

Pic 1 above is the view down the west wall from the front door. In pic 2 the openings from left to right are laundry, main bathroom and main toilet. Ensuite toilet, shower and WIR are in the next wall section.

Pics 3 and 4 is a progress comparison view from the sou’west corner where the WIR is located.

Pics 5 and 6 are from the sou’east and nor’east corners respectively.

Some numbers

Thursday, February 23rd, 2012

Being 38C today gives me an opportunity to sit in aircon comfort and crunch a few numbers.

Blocks poured to date – 467.42
Bags of cement used – 213.5
Blocks per bag – 2.19
Cement cost per block – $3.84
Sand cost per block – $1.55
Blocks per square metre – 5.55
Wall cost per square metre – $29.91

Cubic metres poured – 23.69
Guesstimated cubic metres wasted mix – 3
We are getting better at managing the wasted mix but it is not completely avoidable.

Finally on the downwind stretch

Tuesday, February 21st, 2012

After a good spell of fine weather last week our completed percentage for the walls is now 52%.

We are about 200 blocks away from reaching level 7 around the perimeter and getting all sections to this is the next goal. From there the verandah tie downs are moulded into the wall, using laser levelling for accuracy. Once that is done there are only 170 blocks left to complete the walls!

Half way looming

Saturday, February 11th, 2012

One day this coming week we will pass the half way mark with the amount of mud that needs to be mixed and poured. I’ve lost 3 days over the past 2 weeks to mechanical problems with the mixer and another 3 days to wet weather. This week is promising weather wise and I hope to have a huge week with all formwork cleaned and ready to be set.

First pic is from the perspective I’ve been trying to keep for comparison sake of progress down the west wall. If you scroll back the last few posts on building progress you can see how this is progressing nicely. The wall is reasonably straight, the vertical rise and fall along each layer is I believe caused by shrinkage rates due to rain and temperature and is beyond our control.

The cracking around the front door has been caused by the wood blocks as they get wet and swell causing the earth around to crack. So much for the expert advice of using oil treated wood set into the walls to fix doors and windows to. I have now resorted to using threaded rods, ligatured to the upright wall plate tie down rods and we’ll bolt the frames to the walls rather than screw through the jarrah blocks.  You might be able to pick those rods out in the second pic in the window openings.

Pic 2 is a view from half way down the driveway and shows the 2 largest opening on this side of the house. One is Elise’s craft room window of 1200×1200, with the second one being formed at the right of the formwork seen in the pic and also 1200×1200. Much to the dismay of most people there is no laundry door as we didn’t see the point of having a door on the side of the house where most wind and dust from the road comes from. All the openings this side are the smallest permissible for habitable spaces for this reason.

Trouble with machinery

Sunday, February 5th, 2012

The mixer I’m using is a hand-me-down from my Dad, and it’s life before that would not have been easy being a communal mixer used by immigrants arriving in Australia after WWII. Back then the “new” Australians got none of the luxuries todays immigrants get so they either got on with building a home themselves with the help of like minded members of the community or they kept living in I would imagine squalid conditions in tents and nissen huts. Doing some research on it a few years back now I worked out this mixer was made in Adelaide in the 1940’s and 1950’s so it has some age behind it.

The poor old thing is getting tired and has literally worn out the yoke that holds the bowl causing the gears to miss and drive to the bowl to stop. I’ve spent the last couple of days thinking about how to fix the issue without a literal rebuild in a machine shop, and here is what I came up with as a fix.

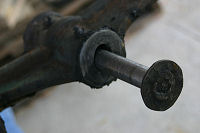
Pic 1 is removing the bowl with the assistance of a verandah beam and a pair of ratchet straps. Pic 2 shows the wear from the back of the yoke. Pic 3 shows almost identical wear at the front of the yoke where the bowl sits. Pic 4 is where I’ve marked the sleeve I need to manufacture and fit start and finishes.

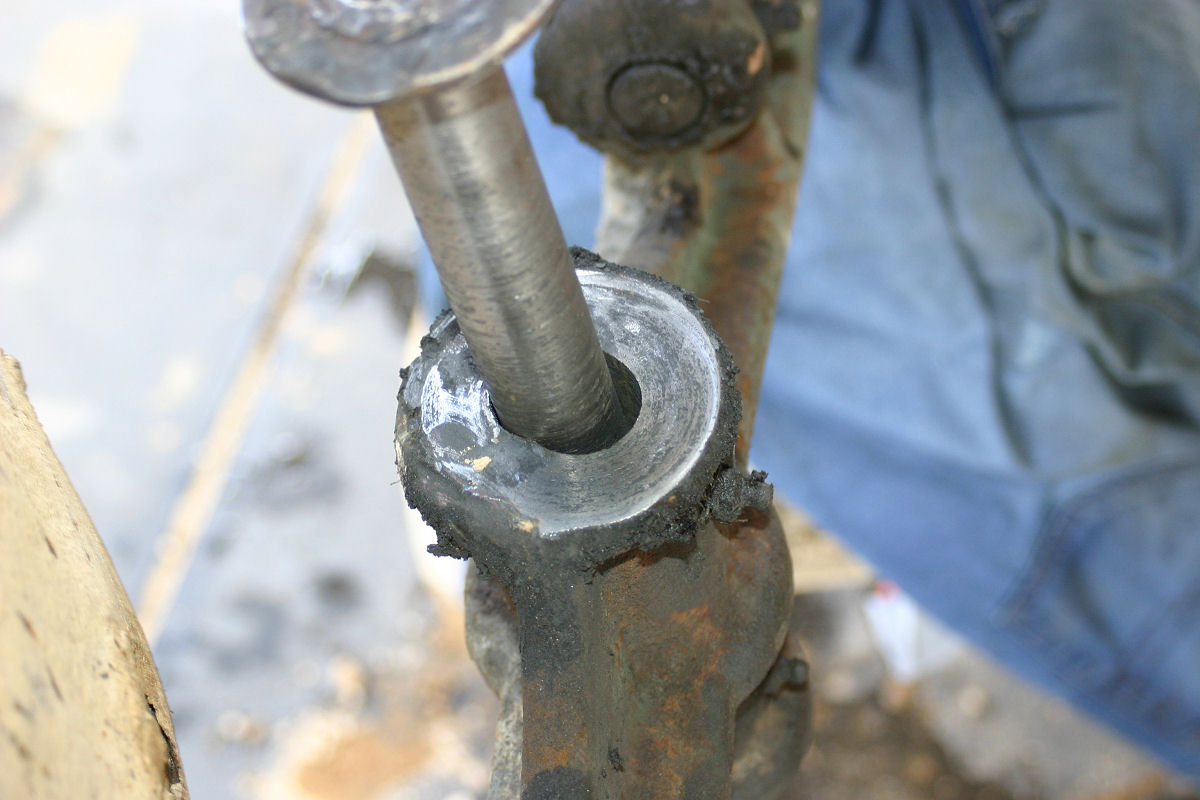
In Pic 1 and 2 above I’ve used a bit of pipe with an inner diameter roughly the same as the pin. I’ve used the pen marks from the pic set above to cut a radius of the pipe. To the back of the radius I welded some 3mm strap steel and then used the grinder to shape it so it fit snugly around the pin as in Pic 3. The yoke is cast iron and is a pig (no pun intended) of a thing to weld anything to, so many repetitive rounds of weld and grind end up with the result in Pic 4. The sleeve itself is not full width of the yoke, as the wear pattern is much like 2 cones stacked point to point and therefore impossible to fit in one piece. Instead I have made a 40mm section fitted to each end.

I repeated the procedure with the front side of the yoke, also adding a layer of weld rod steel to the face of the yoke to harden it and hopefully help keep things aligned to avoid this sort of wear again. I’m not sure how long this fix will last, but I’m sure hoping it at least sees out the build. I have greased and run the mixer unloaded and the “tipping point” noticable in the bowl before the fix is gone.

Past 40%

Saturday, January 28th, 2012

Getting closer to that half way mark! Lots of disruptions from both weather and family commitments over the silly season have slowed progress, but since returning from my two weeks off the build is progressing nicely.

First pic above shows progress down the western wall. The drawing above is the section chart I use to plan what needs to be poured for the next work day. We now have sections 1 and 2 of the 6 sections to 7 layers and have started the first of the window voids as seen in pic 2. Pic 3 is showing the formation of the remaining expansion joints in this wall.

I have 6 blocks left to pour in section 3 and then we’re onto the skinny blocks for the rest of this wall. I can now go back to pouring full width blocks on the east and north walls as well continuing with the skinny blocks. With so much formwork in place I expect to get a lot of blocks poured over the next few weeks.

Once the build is 7 layers in height right around the fixings for the return verandah will be incorporated into the pour of layer 8 and we’ll use a laser level to get this accurate for the corner blocks then use a string line/spirit level combination to get the correct levels for the remaining blocks.

Update on progress

Wednesday, January 4th, 2012

I had always intended to take a couple of weeks off from the build to spend some time with family and will get back to the site and restart building on Jan 9.  Heat is now an issue as well, I’ve set a tools down limit of 35C onsite to keep myself and volunteers safe from heat stroke and exhaustion.

It’s still going up, at least I can say that. We copped a 46mm downpour late in December that wiped out any chance of working safely on site until after Xmas. Imagine a skating rink made out of clay and you’ll have an accurate idea of what the area around the slab was like to walk on.

The first window is about to be started in the western wall which will bring with it some set out issues with positioning the end plates where they need to be to form the opening. We’re also getting close to starting on the
“skinny” sections which will effectively double the blocks we can set and pour before needing to strip the formwork down and reset it.

That brings with it one more issue that I think I have sorted. Since the wood frame for the wet areas is NOT load bearing as it would be in a conventional house we are building the earth wall then fixing the frames in place. To satisfy the BCA and our engineering I still need to fix the frames to the wall using wall ties, however there is no easy or accurate way to fix these small wire ties where they are needed. I am instead going to fix threaded rod into the wall using a steel matrix made out of strap steel to accurately determine the position. Once the walls are up we’ll then build the frames to these positions and use a galv angle bracket and a couple of M10 nuts to fix the frames to the walls.

I am not sure this is even necessary since the external wall is loadbearing and the ties in a conventional build simply stop your brick wall from falling over. However, since they are specified in the detail drawings and engineering we have to have them in place.